by Joseph Herman
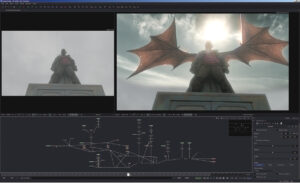
Figure 1: Fusion 9’s node-based workflow is ideal for compositing complex visual effects shots, like this one from Jeepers Creepers III (2017). Courtesy of Trick Digital.
Compositing is a critical part of the filmmaking process, the step where, after months of production, all the elements of a scene are assembled. It’s where visual effects-heavy shots come into their own, and filmmakers finally see their visions come to life. A compositor is like a master chef who combines various ingredients together: a pinch of fog, a dash of lens flare, then key that, add a little camera mapping, track in some bushes… Before long, the final dish — I mean shot — is realized.
When it comes to compositing software that is up to the challenges of creating intricate images for high-end, Hollywood-style productions, there are a few to choose from. Let’s consider three of the most well known.
There’s Adobe After Effects, which comes with the Creative Cloud. Next is Nuke from UK-based The Foundry. The third is Fusion, originally developed by eyeon Software, now owned by Blackmagic Design.
Blackmagic Design’s Fusion, recently updated to version 9, introduces important new features. Having been used in many movies and TV shows including the Harry Potter series, Hugo, Thor, Prometheus and many others, it’s safe to say that Fusion has an impressive pedigree and deserves its place as one of the world’s elite compositing systems (see Figure 1).
Nodes or Layers
A main thing that sets compositing programs apart is whether they’re node-based or layer-based. In the case of the latter, compositing a scene is done by stacking layers up in a timeline (like a sandwich). That is how it’s done in Adobe After Effects.

Figure 2: In addition to 2D compositing, Fusion 9 has a comprehensive 3D environment that allows for 3D objects, cameras and lighting tools.
It’s an entirely different story with nodes. Rather than stack elements atop of each, a node-based composite looks more like a flowchart of interconnected nodes, each of which can have multiple inputs and outputs that pipe into each other. Every node is designed to perform a specific function. For example: Load footage, add effects, color-correct, work in 3D, and make particles. Fusion and Nuke both use nodes.
Nodes or layers? It all really depends on who you are and the kind of work you do. If you’re involved in motion graphics design and your work largely consists of creating graphics and typography, After Effects’ layer-based approach is straightforward and easy to understand. After Effects also works well with other Adobe Apps such as Photoshop, Illustrator and Premiere.
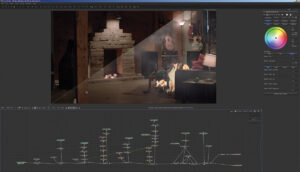
Figure 3: The new 3D camera tracker in Fusion 9 is a critical new feature that offers hundreds of possibilities when compositing, such as this image from the upcoming film Stolen.
Courtesy of Atomic Imaging.
When it comes to complex visual effects shots, such as those found in movies like Gravity or The Matrix Revolutions, it’s a different story. The more complex a shot is, the more issues can arrive when working with layers. To begin with, the timeline stack is prone to getting awfully deep with tons of layers, making things confusing. While some of the madness can be tamed by nested pre-comps, trying to locate a certain layer or effect can feel like a wild goose chase.
Nodes, on the other hand, make the process simpler. To begin with, a comp is entirely represented in a single flowchart view without anything hidden away. And due to its visual nature, a node flow is easy to understand and self-explanatory. Contrast that with a giant wall of layers, which doesn’t tell you much of anything. In addition, a node’s output can be piped into inputs of multiple nodes. You would have to duplicate a layer or effect to do that in a layer-based system, further adding to the confusion and clutter. Therefore, while VFX-heavy shots are possible with layers, many visual effects artists agree that nodes are a better solution.
Both Fusion and Nuke are sophisticated, advanced compositing programs that feature a 3D compositing environment and have been used on an impressive roster of VFX-heavy blockbuster films. While Fusion has a strong and growing following of enthusiastic users, Nuke has the edge right now as far as which compositor is used most often in feature film production (see Figure 2).
However, I wouldn’t be surprised if the balance starts shifting due to several important developments. A few years ago, eyeon Software, the developer of Fusion, was acquired by Blackmagic Design and the software joined its new stepbrother, DaVinci Resolve — another highly esteemed and powerful color-grading, editing and audio post-production application also acquired by Blackmagic.
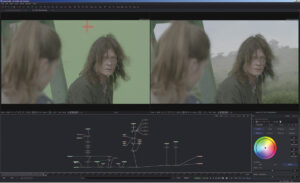
Figure 4: Fusion 9’s new Delta Keyer and Clean Plate tools allow for excellent results when doing green screen keying. From Jeepers Creepers III. Courtesy of Trick Digital.
Just as they did with DaVinci Resolve, Blackmagic proceeded to release a remarkably full-featured free version of Fusion, along with a pro version, Fusion Studio (with some extra features), for around $1,000. That’s not a lot when you consider that Nuke costs around $8,000, plus about $1,500 per year to keep the software current.
Fusion 8 was shortly released, and with it came Mac compatibility. Personally, I use Windows machines, specifically HP workstations, to do my production work. However, many compositors use Macs, a platform obviously important enough to Blackmagic Design to port Fusion to it.
With a free version of Fusion available that was not resolution-restricted for anyone to use (commercially or not), and a reasonably priced pro version an eighth of the cost of Nuke, plus free upgrades, Blackmagic caused many a compositor to raise her or his eyebrows. Fusion is a highly regarded and elegant node-based compositing solution with an impressive track record of movies, and while there are differences, Fusion and Nuke are similar in look, feel and capability.
However, while this dramatic turn of events was reason enough to embrace Fusion, some people bemoaned a few important features they felt were missing to justify switching from Nuke — such as the lack of a 3D camera tracker. Not only did Nuke have a 3D camera tracker, but so did After Effects. It was obvious that, however great it was, Blackmagic needed to get one for Fusion.
Enter Fusion 9
In August 2017, Blackmagic Design released Fusion 9, and with it came several important new features, including (you guessed it) a 3D camera tracker available with Fusion Studio. There are a million reasons to use 3D camera tracking in a scene, such as to incorporate 3D elements into a shot filmed with a moving or handheld camera, to remove unwanted elements, to create set extensions, to do projection mapping, etc. (see Figure 3).
The new 3D camera tracker in Fusion 9 Studio is capable of very precise camera solves, with results on par with what you would expect from Nuke. There is still an issue or two that needs to be ironed out (for example, seed frames should be selected manually, and one should enter a camera focal length close to what the footage shot with), but it is already production-worthy and I’d expect these issues to be addressed in future updates. All in all, the first implementation of the 3D camera tracker is impressive, and should get better over time. By itself, it’s a major reason to start using Fusion Studio.
Fusion 9 Studio also has a new planar tracker, which solves for planes in motion, allowing you to accurately place planar elements (such as signs, facades and textures) onto moving objects. It is also extremely useful for rotoscoping. Previously, one could use the Mocha plug-in, a well-respected third-party planar tracker. However, it’s better to have one built right into Fusion Studio.
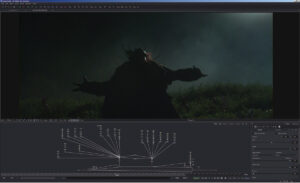
Figure 5: Fusion 9 Studio offers incredible value yet is capable of achieving high-level professional results for any compositing project. From Jeepers Creepers III. Courtesy of Trick Digital.
Chroma-keying is a critical part of visual effects and while Fusion already contained capable keying tools, Fusion 9 introduces the Delta Keyer, a new color difference keyer that achieves exceptionally clean green screen keys, for both the free and Studio versions. Nuke’s Keylight color difference keyer is used extensively in the business, but the Delta Keyer can achieve similar results — another compelling reason why Fusion 9 is a strong alternative to Nuke. In addition, Fusion 9 has a new Clean Plate tool (also available in the free and Studio versions) that can re-create the smooth and solid clean green screen behind actors, which is useful in conjunction with the Delta Keyer (see Figure 4).
As mentioned above, while the Delta Keyer and Clean Plate pre-keyer are included in the free version of Fusion, the 3D Camera and Planar Trackers are not. For those tools, you’ll need to purchase a license for Fusion Studio. However, with Fusion 9 came the remarkable news that Blackmagic Design was dropping the price of Fusion Studio from $995 to $299 (which includes free upgrades). That means that for not much more than the cost of many third-party plug-ins out there, you get the pro version Fusion Studio.
Compare that to Nuke’s price tag, which can be significant to small boutiques or individual artists. While a free, non-commercial version of Nuke is available for learning, you cannot use it for commercial projects and its resolution is restricted to 1920 x 1080. No such restrictions apply to either version of Fusion 9.
More Compelling Features
There are other important features in Fusion 9 Studio, including Studio Player, a new annotation and versioning tool for shot review and approval. Studio Player has support for LUTs and can be output via Blackmagic’s hardware, as well as be synchronized for remote viewing. Fusion 9 Studio also allows for unlimited network rendering, which means that those working on large projects won’t have to pay a license fee for each render node.
Fusion 9 also boasts increased GPU acceleration, and allows support for additional formats and file types such as DNxHR and MXF, as well as Apple’s ProRes, which Blackmagic has officially licensed to work on Windows. This should not be overlooked, as some will want to get Fusion specifically for ProRes output.
While VR is not really my thing (at least not yet), Fusion 9 also includes tools for immersive content like a new panoramic viewer and support for VR headsets such as the Oculus Rift and HTC Vive. These provide a completely interactive VR working environment that allows you to interact with elements in a 360-degree scene in real time.
Conclusion
There are lots of good reasons to use Fusion to composite. The new built-in 3D Camera Tracker, Planar Tracker, Delta Keyer and Studio Player more than justify the Studio version’s $299 price tag (naturally, the free version is a steal). I only expect Fusion to get better in the house of Blackmagic Design, and continue to innovate, expand and gain enhanced interoperability with DaVinci Resolve (see Figure 5).
The future of Fusion seems bright. To what degree it will displace Nuke in the world of high-end compositing for feature film remains to be seen. A lot of people are Fusion fans already, and there’s a good chance it could become the go-to compositing application for many more.


